When I joined RipeGlobal in 2016, I was just starting out as a young dentist, looking to understand what truly excellent dentistry looked like. I was fortunate to connect with educators like Dr. Lincoln Harris, Dr. Michael Frazis, and Dr. Michael Melkers, who didn’t just share their successes—they shared their struggles and setbacks, too. That honesty was invaluable. It helped me build confidence and gave me a clear, achievable path to improve my work and tackle challenges.
Today, as a specialist prosthodontist in the UK, I’m excited to bring my years of experience to RipeGlobal as an educator, hoping to inspire and support others on their own clinical journeys.
Now, let’s dive in…
Getting great results with composite restorations is all about balance—achieving natural-looking outcomes that are also durable, precise, and, of course, predictable.
Injection molding is a technique that can take a lot of the stress out of anterior restorations when done right. In this blog post, I’ll walk you through why it’s become one of my go-to approaches, especially for those tricky cases where accuracy is everything.
Why Injection Molding?
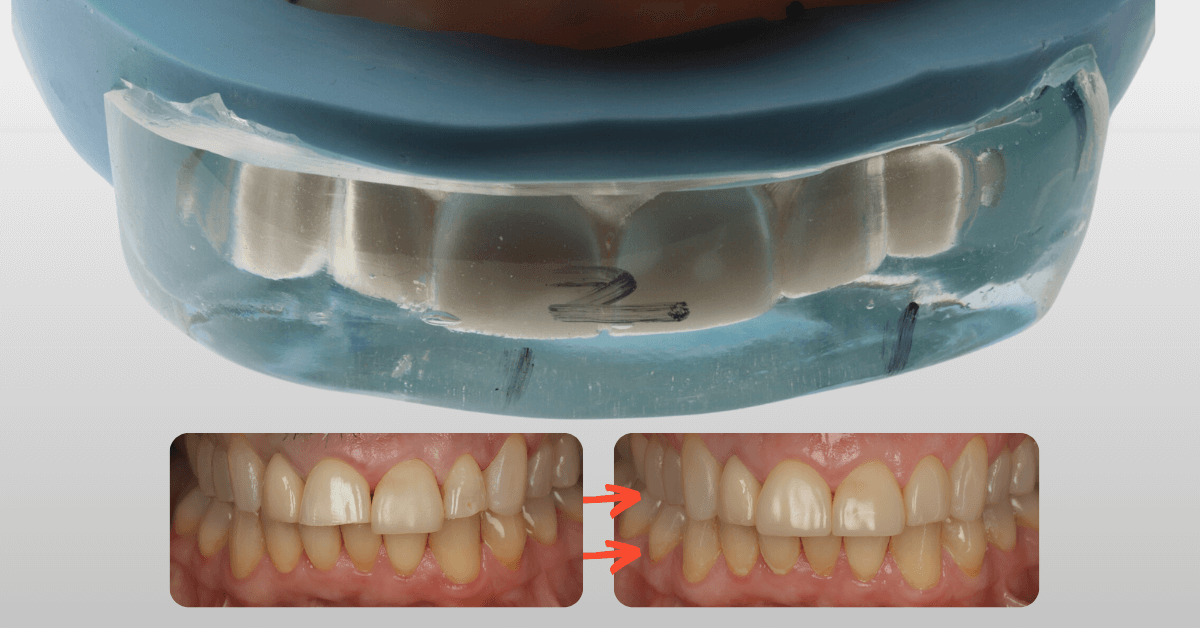
The whole idea behind injection molding is to take some of the guesswork out of anterior composite restorations. Utilising accurate diagnostic wax ups with a clear silicone stents allows us to create highly aesthetic, predictable results without constantly adjusting or second-guessing. For me, this approach has been a game-changer, especially when working on high-stakes cases in the aesthetic zone.
When it comes to restoring worn, chipped, or fractured incisors, I’m always looking for a technique that saves time without compromising quality.
Here are the four key benefits of composite restorations with injection molding:
1. Perfect for Precision in Aesthetic Cases
Injection molding allows us to capture precise tooth morphology that was designed from a wax-up or digital design. This means we can copy the exact anatomy rather than having to create it ourselves, which often takes a lot of time and skill. By using a clear silicone stent, we can replicate the intricate details of the tooth structure, ensuring a natural and harmonious appearance.
Example: When a patient comes in with worn teeth, this technique can give a more predictable, polished result with less effort, as we’re transferring the exact morphology from our design to the patient’s tooth.
2. Digital Design and Diagnostic Wax-Ups Make Life Easier
I’m a big fan of starting with a diagnostic wax-up or digital design. Not only does it give us a visual of the end goal, but it also acts as a foundation for creating a clear silicone stent that guides the composite placement. Think of it like a roadmap—it removes a lot of guesswork from the process and helps us nail those natural contours and shapes more efficiently. Plus, working from a digital design helps us and the patient see exactly what we’re aiming for from the start.
3. Saving Time with Less Adjustment
One of the biggest wins with injection molding is that it cuts down on chair time. Instead of tweaking incisal edges or adjusting contours multiple times, the clear silicone stent provides a guide that gets us pretty close to the final shape on the first go. This makes the process faster and much more predictable, which patients love because it means they’re spending less time in the chair.
4. Tips for Troubleshooting Complex Cases
Injection molding isn’t always a one-size-fits-all solution. In the webinar, I talked about how to tackle some of the common challenges that can come up, like selecting the right materials or deciding when a different approach might actually be better. Knowing these limitations means we’re able to make informed decisions and approach each case with a bit more confidence—especially when things get tricky.
A Simple Step-by-Step Guide to Injection Molding
Here’s a straightforward rundown of how I approach injection molding for composite restorations:
1. Start with a Diagnostic Wax-Up
The first step is working with a diagnostic wax-up or digital design that reflects the desired shape and contour of the final restoration. It’s essentially a prototype, and it makes the entire process smoother by providing a visual guide of what we’re aiming to achieve.
2. Create the Clear Silicone Stent
Once the wax-up is ready, I use it to create a clear silicone stent. This will serve as a template, helping us place the composite with accuracy and precision, rather than relying solely on freehand skills. The transparency of the stent allows for better light curing and visualization during the procedure.
3. Apply the Composite with Injection Molding
With the stent in place, we can apply the composite into it, ensuring it follows the exact contours of the wax-up or digital design. This step is where injection molding really shines, as it keeps the restoration consistent with our planned morphology.
4. Finish with Minimal Adjustment
Because we’re working with a precise stent, there’s a lot less need to adjust the shape and polish afterward. This keeps the chair time down and helps ensure a predictable, natural-looking finish.
By following this approach to guided composite placement, you will achieve predictable, beautiful outcomes in your composite restorations while saving valuable time.
Want to take your composite work to the next level? Watch my full lecture on Predictable Outcomes in Composite Restoration with Injection Molding here with a RipeGlobal Membership. Or you can join a RipeGlobal Fellowship to get hands-on experience and mentorship from world-class educators right here.
You can also follow me on Instagram @sharplingdental for more tips and to stay updated on my upcoming masterclasses.


